My Thoughts and Know-how

My Thoughts and Know-how
|
Behringer Truth B2031A - how truthful is it? |
23 Feb 2022 |
|
I bought one speaker out of curiosity. I wanted to see the value the speaker delivers for just $199 (in 2022!).
What a great first impression unboxing and taking it apart! These things are designed (thanks, Genelec!) and built (thanks, Behringer!) really well: the cabinet is dense and solid, the driver frame is cast, the circuits have good layout and soldering. Speaking of circuits: 3 TDA7293 chip amps power it, fed by a toroid transformer. At the ±42V supply voltage, the power these chips can deliver is over 300W. This is not the 20-year old B2031A design you see reviewed online: on the outside it looks the same, but the PCB is a new revision of the now discontinued B3031A (which I have had for 10 years and like a lot).
I particularly like the front facing bass ports and the down facing rear connectors that make placement easy. But then you turn it on... Right out of the box, my B2031A sounded bright. Sure enough, a sweep confirmed the tweeter is 4-5 dB too loud above 4 kHz. They say it is factory calibrated... Did the technician stick the microphone in the woofer? |
|
| amplifiers speakers | Comment |
Making a Coronavirus Face Mask |
31 March 2020 |
|
I wanted to design and donate a face mask that satisfied these requirements:
 A comfortable face mask separates my germs from other people's germs. I believe I was able to hit those due to several design choices:
|
|
| 3d printing | Comment |
Quake 3 Graphics Mod |
12 May 2019 |
|
This year is Quake 3's 20th anniversary! It is my favorite game (along with StarCraft: Broodwar) and since it is now open source I decided to give it minor updates, to restore its status of perfection. There are other mods, such as ioQuake3, but my goal here was to do minimal changes, and true to the initial spirit, the final patch is only about a page of strategically placed new code.
|
|
| c/c++ computers games | Comment |
JBL Charge 2+ Frequency Response |
17 April 2017 |
|
I put my barely-taken-out-of-the-box JBL Charge 2+ bluetooth speaker to the test and I was quite impresed!
The DSP changes the response with volume. This review has detailed measurements. |
|
| amplifiers speakers | Comment |
JBL LSR310s Teardown and Analysis |
8 August 2016 |
|
The JBL LSR310s sub is so good I had to take it apart. I hesitated buying it since I wasn't a fan of the downfiring and not grill-protected woofer, but having the LSR305s I decided to be brand loyal and wow: -3dB at 32Hz and quite flat above. It is audible with uncolored bass lower, though at much diminished SPL, which my equipment cannot properly measure, so let's say -10 dB at 27 Hz. Board shots follow, let's go thorugh! |
|
| amplifiers speakers | Comment |
Regular 2D Videos in VR |
27 Dec 2015 |
|
Here is a Media Player Classic plug-in that displays traditional 2D videos on the Oculus Rift DK2, mimicing a cinematic experience. Even though we are few months away from the release of the VR headsets, I found numerous VR video players available, either free or paid. However, none of them provided me the simple "just works" and familiar experience I was looking for, hence this work.
|
|
| VR | Comment |
JBL LSR305 Teardown and Analysis |
2 June 2015 |
|
The JBL LSR305 has a space age looking waveguide that indeed does provide subjectively omnidirectional tweeter pressure, while the wide flared port has practically no wind noise. The resulting sound lacks a bit of detail, but is otherwise outstanding at its $130 price point. Surprisingly, the speaker does not offer over-power protection or any power saving capabilities, both of which could have been implemented using the existing chips. There is also a peculiar bug, which might be destructive. I am particularly interested in the design because of the switched mode power supply, digital filtering and class D power amplification. Here are the guts, let's dive in!
|
|
| amplifiers speakers | Comment |
Clipping Protection |
24 May 2014 |
|
How do we add clipping protection, overpower protection and automatic standby to a studio monitor? ...Using a microcontroller! ;-)
Functionality
The input and output of the LF amp are fed to the differential ADC input of the microcontroller (ATTiny85). When clipping occurs, the output fails to follow the input causing the MCU to mute the power IC (LM4776) until the input signal decreases to a lower level. Similarly when the HF amp overpowers the tweeter (I set the threshold to 15W), the system is also muted.
|
|
| amplifiers speakers | Comment |
Minimalistic HIFI Bi-Amplified Speaker System |
30 Jan 2014 |
|
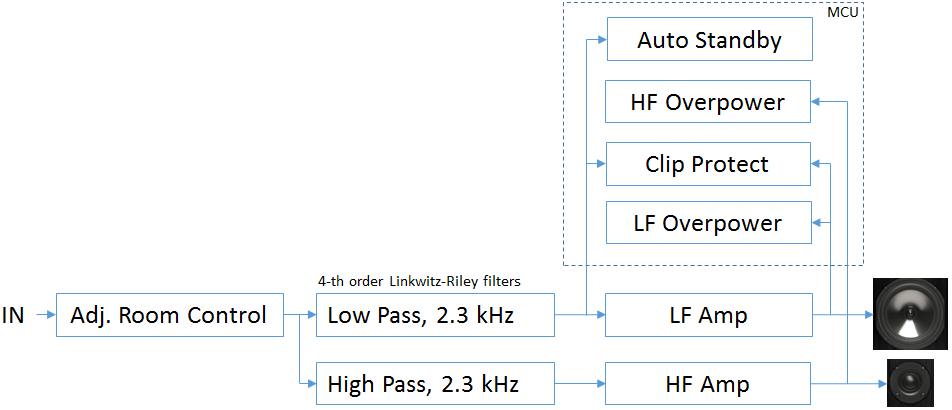
There are numerous advantages to self-powered bi-amped speakers, including more efficient and quality cross-overs, amplifier-to-driver matching, driver response equalization, and lower distortion. These benefits, however, come at the cost of making these systems complex - a professional studio monitor has 10+ amps, split among the filter sections, protection circuitry, gain stages, etc. These in turn require at least low voltage and high voltage power supplies, leading to a complex design that is hard to build as DIY, more prone to failure, has higher distortion and noise, etc. Here I present a system of my own design with minimal number of components, yet delivering all benefits listed above. It is based on the popular in studio monitors 4th order (24 dB/octave) Linkwitz-Riley cross-over since it allows for phase aligning the tweeter and woofer at the cross over-frequency. The novelty here is in adding significant filter gain in the pass-band region, which allows us to use the power amplifier as the active element of the active cross-over. This eliminates the need for any opamps and extra voltage supplies. The resulting filter is imperfect (in fact each channel has many poles and zeros), but due to the strength of the power amplifier (compared to an opamp) a wider range of resistor values can be chosen to qualitatively eliminate the imperfection. The frequency response is further shaped by frequency dependent impedence in the feedback loop to boost the bass and cut the supersonic frequency content. Here is the complete circuit diagram:
The schematic is concise because components play multiple functions. The block diagram should clarify what is happening.
|
|
| amplifiers speakers | Comment |
Giving Deeper Bass to a Bookshelf Speaker |
6 Nov 2013 |
|
The 2-way Boston Acoustics Classic Series 26 speakers (6" woofer, 1" tweeter) offered mostly faithful reproduction of sound at a low price ($125 each). Measuring their frequency response yields relatively flat pass-band except for an audible notch at 3kHz, resulting from a poor cross-over and destructive interference between the woofer and sound reflected from the back wall of the speaker.
CS26 Frequency response*. Ignore the sub-100Hz part due to a limitation of my equipment.
Speaker/room EQ can easily correct for the dip, so the real weakness of the speaker is lack of deep bass, which here we will correct (I listen to them without a subwoofer). The speakers' bass reflex port can be improved in 2 ways.:
The bass reflex passes mid-band signals straight-through, which interfere with frontal sound. The port length is roughly inversely proportional to the square of the resonance frequency. I wanted to bring the resonance to around 45 Hz, or a 50% increase in port length. That would make the port longer than the depth of the speaker. Fortunately, the way I solved this, also mostly eliminated the mid-band pass through problem - I made a turn inside the port, midway through.
Serpentine bass port has lower resonance and blocks unwanted signals. I used sound blocking rubber on the outer side of the turn. I constructed the new port from 2" ABS (aka gutter) pipes and ABS cement (which actually disolves the plastic and makes the final pieces appear molded).
|
|
| receivers speakers | Comment |
Lowering the Idle Temp of Yamaha RX-V2500 |
15 Sept 2013 |
|
RX-V2500 is a powerful receiver. The respectable 130W/ch at 0.04% THD is well complemented with the user tweakable 7-band/ch programmable filters that allow for changing their frequency, gain and Q-factor (or YPAO, in Yamaha lingo). Although the receiver delivers outstanding audio performance, it operates rather inefficiently and has a mild temperature problem. The Yamaha engineers went for a linear power supply and a traditional class A/B power amplifiers making the unit dissipate much more energy as heat than what is delivered to the speakers (at "normal" listening levels). The operating temperature is further exacerbated due to obstructed air convection. The heat channel cools the unit effectively only when the fan spins which never happens in practice, due to an overly aggressive acoustic design point.
The unit is equipped with a fan blowing air from the transformer into a channel made from the aluminum heat sinks of the power amplifiers and LDOs. I was determined to make the receiver run cooler. Altering the efficiency, particularly at idle, would increase harmonic distortion, so I was left only with the option of modifying the fan rpm vs. temperature curve. I opened the receiver up and studied the fan control circuitry for a tweak. For a surprise, the design, though simple conceptually, was implemented in literally 10x the number of components I would have expected. To make matters worse, the simple fan control was distributed to several boards. With details abstracted, here is the fan control diagram:
|
|
| receivers speakers | Comment |
Replacing the Speaker Surrounds of Bose 501 Series IV |
21 April 2012 |
|
Patiently hunting on eBay and craigslist, I have acquired 4 Bose 501 series IV speakers from 1985. They were made when Bose had focused on features and quality rather than marketing and so they sound very well. Some of the notable features include a 5 sided speaker cabinet to minimize standing waves and a back-facing tweeter to make the sound spacious (unison effect). The frequency response is relatively flat, excluding a minor resonance at about 8 kHz.
My bedroom A/V entertainment area. The 501s are the 4 speakers on the sides.
Being about my age, these vintage speakers needed some repairs. The first point of speaker failure due to age is usually the foamy speaker surround. The 501s were not designed to be easily user serviceable and so after fixing 4 speakers, I developed a procedure to replace the surrounds that works well. Prerequisite materials include new 10" surrounds and a bottle of glue that bonds with metal, rubber and paper. Step 1: Removing the speaker cloth and its frameUsing a knife gently raise the cloth frame
Reach the staples with the tip of a chisel or a flat screw driver. Then using a shim for support, press down on the chisel handle to pull the staples out. If a staple cuts through the frame and stays on the cabinet, take it out.
Step 2: Replacing the surroundsTake the woofer out. Cut through the remaining surround if parts of it are still in tact and then reach between the cone and the paperboard ring. Wedge your fingers under the ring and take it out.
Clear any glue and surround remains and apply a ring of new glue on the metal, slightly towards the center.
Centered the new surround on top of the layer of glue and add another ring of glue on top of it.
|
|
| speakers | Comment |
Microcontroller Class D Amplifier, Rev2 |
11 March 2012 |
|
A problem of the first revision of this amplifier was the limited precision at low volumes. Although the PWM of the ATtiny45 is just 8-bit, I realized that it can produce arbitrary precision output. Timer1 can be clocked at 64 MHz from the high frequency PLL, which combined with the double-buffered counter compare value and the overflow interrupt, can get 9 and even 10-bit precision in the audible range. Lets say we want to DAC the value 300/512. We set OCR1A to 255 (which will hold the output high) and on the timer overflow, we write 300-255 = 45. Writing this 9-bit value takes 2 timer cycles. |
|
| amplifiers electronics | Comment |
Monosynth |
23 Feb 2012 |
|
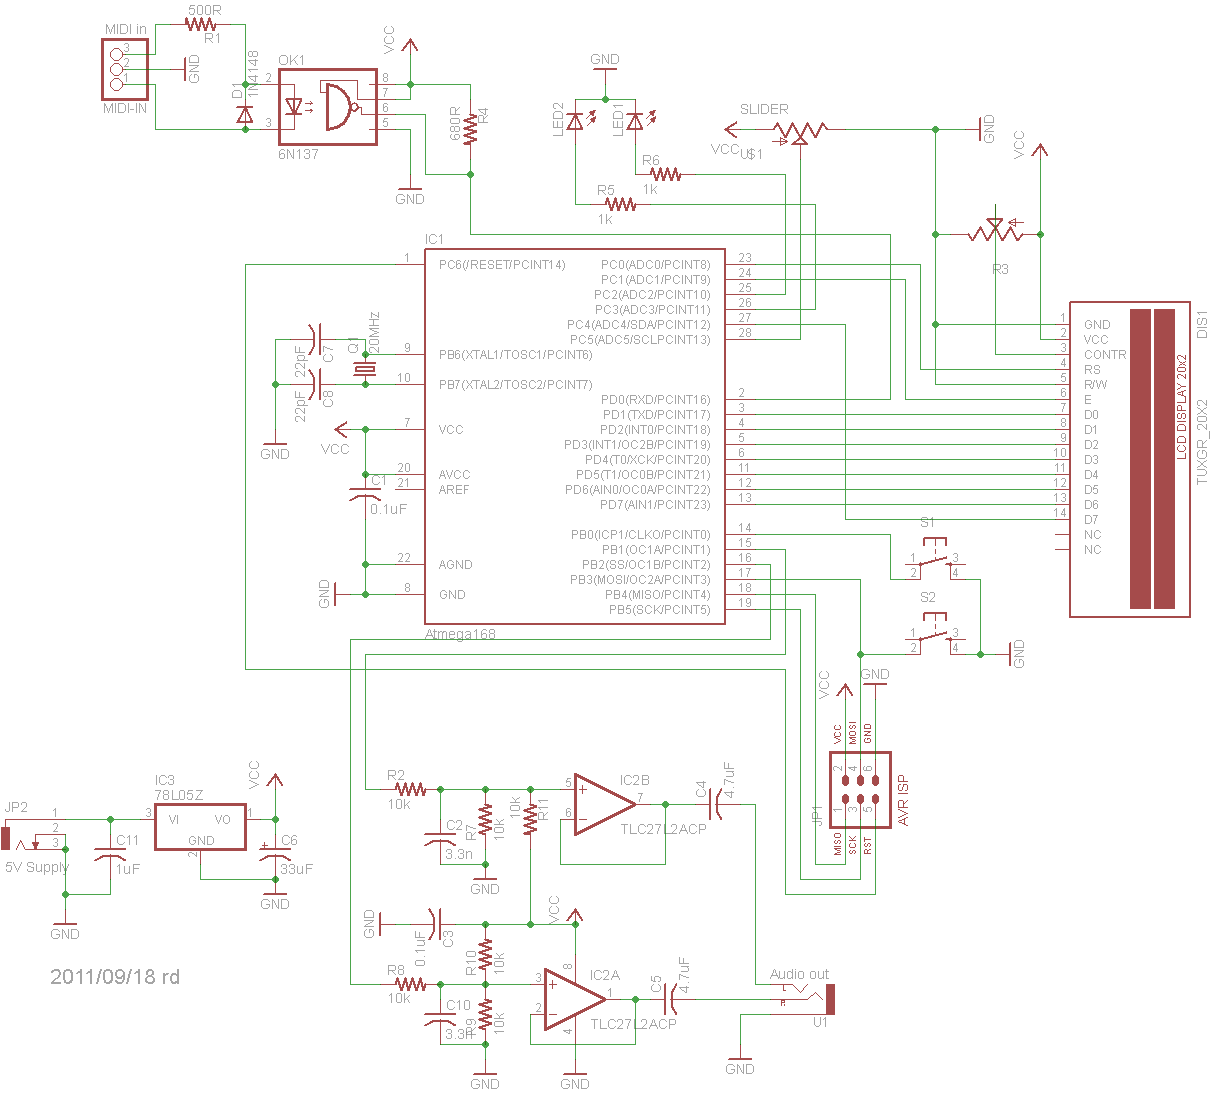
Monosynth is a MIDI controlled monophonic synthesizer.
The buttons change the menu and the slider inputs the parameter values Software
Block diagram
There are 2 concurrent threads of execution: a control thread for computationally intensive tasks, such as envelope updates and the user interface, and a fast sample generating thread that preempts everything else. MIDI messages are received by the serial interface interrupt handler and are quickly queued for parsing by the control thread. |
|
| music electronics | Comment |
Microcontroller Class D Amplifier |
5 Feb 2012 |
|
This article is about an obsolete version of the amplifier. For the new revision, go here. Class D amplifiers are very efficient and could be simple to build. They operate the power stage in a binary mode and pass the delivered pulse train through a low-pass filter (which might involve the speaker itself) to filter all frequency components introduced by the switching of current.
I designed a 70W bridged amplifier based on the Atmel Tiny (attiny45) microcontroller. Vcc is 12V and it requires no heat sink, nor has a feed-back loop of any kind. The output power is limited by 2 factors:
|
|
| amplifiers electronics | Comment |
Reversing the Bits of an Int |
16 Jan 2012 |
|
The most efficient way to reverse an N bit integer on a PC is in O(lgN). This involves shifting registers by many places and not all architectures natively support that. Take AVR - LSL and LSR shift by 1 place only. Furthermore, many of the smaller AVR microcontrollers have limited memory space making look-up tables impractical. Fortunately, the naive linear bit reversal can be done in 2N operations, making it fast enough. To reverse the bits in a register we need a stack - push the bit at one end, then shift the number towards the same end. After doing that for all bits we do the reverse: popping followed by shifts in the other direction. AVR and many other ISA allow this in hardware through the carry flag (CF).
|
|
| c/c++ computers | Comment |
Sound Distorter |
06 Oct 2011 |
|
Sound Distorter runs mostly in software - a tool chain preprocesses a midi file so that it can be efficiently stored and played on the 8-bit Atmega168 microcontroller. After loading the chiptune midi file, sconv runs a series of filters to compact it and to preprocess operations to save cycles on the microcontroller. For example, instead of storing the tone (such as C#4), it could store the frequency. To be more efficient, it actually stores the wavetable offsets in samples per sample. Thus, playing a tone becomes a matter of just incrementing the wave-table index. The optimized file format I call .sad, short for sound distorter and the reminiscence of the C64 .sid should be obvious :) Finally, the .sad file gets converted to an assembly listing because the only way it can fit into the Atmega168 is in the text segment as program instructions.
The synth runs in 2 threads - a heavy-duty control thread that schedules events (such as note on, pitch-bend change, volume, etc.) and a fast, sample generating thread. The sample generator has real-time constraints and may preempt the control thread. To guarantee fairness, if overrun occurs and the control thread doesn't get to run, the synth drops (but does not delay) a sample. The sound generators use 2 shape wave-table - a sinusoid and a sharp, noisy wave. Besides the volume envelope, there is a blend envelope that linearly mixes the two shapes so that the sound changes in time. For example, during attack, primarily the noisy shape can be used, eventually resolving to a sinusoidal soft tone to mimic a plucking sound. Initially, I implemented FM modulation, but since the two wave shapes actually produce similar sound quality computationally much faster, I dropped it. There is also per channel pan mask to produce simple stereo effects.
The generated wave is then converted to an analog signal using 2 of the on-chip pulse-width modulators. To filter out the pulses and the bit flipping, the signals go through second order Sallen-Key low-pass filters.
The circuit board. I feel I've made the project fairly easy to understand - code, schematic, mp3 and more pics. A secret prize goes to the one who figures out what the 3rd chip is for :) |
|
| music electronics | Comment |
Web Forms |
1 May 2011 |
|
One of the places where HTML, JavaScript and PHP are in perfect harmony is web forms. Forms are defined by the form tag and can contain most of the other HTML tags. Out of those, input elements (such as text boxes) pass data to the server. The name attribute of an input element can be thought of as a variable which the web server reads. For example: <form action="comments.php" method="post" name="myform"> <input type="text" name="email"/> <input type="submit"/> </form>will generate a textbox with a button. After the user clicks the button, the server can read the text from within comments.php via $_POST[email]. There are actually two methods which post the data:
What's sleek about forms is that it is trivial to add client-side error checking in JavaScript. This will not replace proper server-side verification as it is easy to bypass, but might help reduce unneeded server load and annoyance of the user while waiting for the page to refresh. We need to define a boolean-returning function and add onsubmit="return checkEmail()" to the from declaration. If checkEmail() returns true, the form is submitted, otherwise the button click is silently ignored. I used:
function checkEmail()
{
	if(!document.myform.email.value.match("^.+@.+\..{2,4}$")) {
		alert("Please enter a valid email.");
		return false;
	}

	return true;
}
where we use the convenient match() method of the String object to test the string against a Perl regular expression.
This was my web forms in a nutshell. You can see & test the complete implementation in the blog's comments by using them :) |
|
| www computers | Comment |
The Making of a Blog |
25 April 2011 |
|
How much code does a blog take? 1.8KB. It might be simple but this includes its PHP, HTML and CSS. My minimalistic blog is quite simple. It uses PHP's built-in parse-ini-file() to parse an .ini file (which stores all blog entries) into a hash. The keys are the sections of the .ini file and the values are themselves hashes that contain the sections' value-pairs. All that is left is a for-loop that iterates over the top-level hash to generate 3 rows of a HTML table at a time. The upper row contains the heading and the date, the middle one has the body text while the lower is for the comments link.
$contents = parse_ini_file('entries.ini', true);

foreach ($contents as $header => $data) {

	echo "<tr style=\"background: $data[color];\">";

	...

}
|
|
| www computers | Comment |
|
Home
Top
|
|


